
Embark on a journey of installing cedar siding with this in-depth guide that covers everything from preparation to maintenance. Dive into the world of cedar siding installation with expert tips and insights.
Before you start your next home improvement project, make sure you're well-equipped with the knowledge and tools necessary to tackle cedar siding installation with confidence.
 . Below are the key steps to guide you through the installation:
Preparation for Installing Cedar Siding
Before beginning the installation of cedar siding, it is crucial to prepare the necessary tools and materials and ensure proper safety measures are in place.Tools and Materials Required:
- Cedar siding panels
- Hammer or nail gun
- Saw
- Tape measure
- Level
- Chalk line
- Primer and paint
- Caulk
- Protective gear (gloves, goggles, mask)
Importance of Proper Preparation:
Proper preparation ensures a smooth and successful installation process. By having all the necessary tools and materials ready, you can work efficiently and effectively without interruptions.Safety Measures:
- Wear protective gear to prevent injuries from sharp tools or flying debris.
- Work on a stable surface and use a ladder with proper safety precautions when working at heights.
- Follow manufacturer instructions for any power tools to avoid accidents.
Types of Cedar Siding
Cedar siding offers a variety of options for homeowners looking to enhance the exterior of their homes with a natural and durable material. Let's explore the different types of cedar siding available in the market and compare their pros and cons.1. Cedar Shingles
Cedar shingles are thin, tapered pieces of wood that are installed in overlapping rows on the exterior of a house. They offer a rustic and traditional look to homes and are available in different grades, from clear to knotty.- Pros:Cedar shingles are lightweight, easy to install, and provide excellent insulation. They also have a natural resistance to insects and decay.
- Cons:They require regular maintenance, can be more expensive than other options, and may not be as durable as some other types of cedar siding.
2. Cedar Clapboard
Cedar clapboard, also known as cedar lap siding, is a popular choice for residential construction. It consists of long, overlapping boards that create a traditional look for homes.- Pros:Cedar clapboard is durable, versatile, and can be stained or painted to match any aesthetic. It also provides good insulation and is resistant to rot and decay.
- Cons:It may require more maintenance than some other types of siding, and installation can be more labor-intensive.
3. Cedar Board and Batten
Cedar board and batten siding features wide boards with narrow strips (battens) covering the joints. This style adds texture and visual interest to a home's exterior.- Pros:Cedar board and batten siding is easy to install, provides good insulation, and has a rustic charm that complements many architectural styles.
- Cons:It may require more maintenance due to the gaps between boards, and can be prone to warping if not properly sealed and maintained.
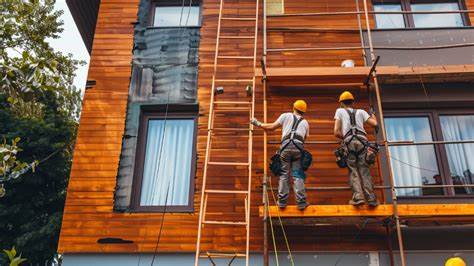
Installing Cedar Siding Step by Step
When installing cedar siding on a structure, it is essential to follow a step-by-step process to ensure a proper and durable installationPreparing the Surface
- Before installing cedar siding, make sure the surface is clean, dry, and free from any debris or existing siding.
- Apply a weather-resistant barrier to protect the structure from moisture and water damage.
- Inspect the surface for any damage or rot and make necessary repairs before proceeding with the installation.
Cutting and Fitting Cedar Siding
- Measure and mark the cedar siding pieces accurately before cutting to ensure a precise fit.
- Use a sharp saw or specialized tools for cutting cedar siding to prevent splintering or damaging the wood.
- Test fit each piece before securing it in place to avoid any issues with alignment or gaps.
Securing Cedar Siding in Place
- Start by installing the starter strip at the bottom of the structure to provide a solid base for the cedar siding.
- Use galvanized or stainless steel nails to secure the cedar siding in place, ensuring they penetrate the studs for a secure attachment.
- Leave a small gap between each cedar siding piece to allow for natural expansion and contraction due to temperature changes.
Maintenance and Care of Cedar Siding
Regular maintenance is crucial for preserving the beauty and longevity of cedar siding. Proper care can prevent issues such as rot, mold, and discoloration, ensuring your siding stays in top condition for years to come.Cleaning Cedar Siding
To clean cedar siding properly, follow these steps:- Start by removing any debris or dirt using a soft-bristle brush or broom.
- Mix a solution of water and mild detergent or a specialized cleaner for cedar siding.
- Use a soft cloth or sponge to apply the cleaning solution to the siding, working in small sections.
- Rinse the siding thoroughly with clean water using a garden hose or pressure washer on a low setting.
- Allow the cedar siding to dry completely before applying any sealant or stain.
Common Issues and Solutions
When dealing with cedar siding, you may encounter the following common issues:- Rot:Inspect the siding regularly for signs of rot, such as soft spots or discoloration. Replace any damaged boards promptly to prevent further deterioration.
- Mold and Mildew:Clean the affected areas with a mixture of water and white vinegar or a commercial mildew remover. Ensure proper ventilation to prevent mold growth in the future.
- Discoloration:To restore the natural color of cedar siding, consider applying a wood brightener or restorative cleaner. Follow the manufacturer's instructions for best results.
- Weather Damage:Protect your cedar siding from harsh weather conditions by applying a quality sealant or stain. Reapply the finish as needed to maintain its protective barrier.


